Managed package install guide
How to Install ROI Steward on Salesforce
Step-by-step setup for production and sandbox orgs: install the package, activate your license, sync entitlements, and open your first dashboard.

This guide is for administrators installing the ROI Steward managed package into a production or sandbox Salesforce org. Use the install links below or from your welcome email.
Compact managed package with the ROI Steward Lightning app, packaged reports, and scheduled jobs. Customer Salesforce data is not sent to external systems except optional license validation callouts you enable.
Install links
Loading current install links…
Current release:
Log in to your target org first, then click the matching button. Use Production for your live org; use Sandbox for a copy or test org (recommended for first installs).
Install links are not available right now. Use the links from your welcome email or contact us for the current URLs.
Haven't signed up for a trial yet? Start your free audit. You receive a Welcome email first; your license key arrives in a separate email shortly afterward.
Before you start
- A Salesforce production or sandbox org
- System Administrator access (or equivalent) to install packages and assign permission sets
- Your ROI Steward license key — Start your free audit to request one if you do not have a key yet. Welcome email arrives first; license key email follows shortly.
- For sandboxes: your production org id (see step 3 below)
Step 1 – Install the package
- Log in to the org where you want ROI Steward installed (production org before Install in Production; sandbox org before Install in Sandbox).
- Click the matching install button on this page (or open the link from your welcome email). If you are not logged in, Salesforce prompts you to sign in; the package installs into the org you authenticate to.
- On the Salesforce install screen, choose Install for Admins Only (recommended) or Install for All Users if your policy allows.
- Approve third-party access if prompted and wait until the install completes.
Step 2 – Assign permission sets
The package includes these permission sets:
| Permission set | Purpose |
|---|---|
| ROI Steward Admin | Full access; required for configuration and scheduling |
| ROI Steward Configurator | Configure settings and run analysis (includes Viewer access) |
| ROI Steward Viewer | Read-only access to dashboards and reports |
| ROI Amount Display | Add-on: shows dollar amounts (assign with Admin or Configurator) |
- Go to Setup > Users > Permission Sets.
- Assign ROI Steward Admin to yourself and other configurators.
- Optionally assign ROI Amount Display, ROI Steward Configurator, or ROI Steward Viewer.
- Open the ROI Steward app from the App Launcher.
Step 3 – Sandbox only: set production org id
Your license key is issued for your production org id. Sandboxes have a different org id, so the app must know which production org your key belongs to before validation succeeds. The ROI License Config custom metadata type is included in the package.
- In your production org: Setup > Company Information - copy Organization Id.
- In your sandbox: Setup > Custom Metadata Types > ROI License Config > Manage Records > Default.
- Set ROI Production Org ID to that production org id.
Production orgs: skip this step (the app uses the current org id automatically). Sandboxes: complete this step before step 4 (license activation).
Step 4 – Activate your license
Use either paste-from-email or online validation (after signup, when your org allows callouts).
Option A – Paste your license key
- In the ROI Steward app, open the ROI Configuration tab.
- Paste your License Key into the field and Save.
- Tier, expiry, user count, and related fields update automatically.
- License Package Version is shown for support.
Option B – Validate License online
- Enable License URL Enabled on ROI Configuration.
-
Activate the packaged Remote Site Setting ROI Steward Licensing:
Setup > Remote Site Settings — open ROI Steward Licensing
(
https://roisteward.com, ships inactive), Edit, check Active, Save. (Older installs: New Remote Site with the same URL.) - Click Validate License to fetch and apply your key.
Validate License requires a license already issued for your org (for example after signup). It does not create a new trial by itself. If you signed up recently, wait for the license key email before using Validate License. If something looks wrong, contact us.
Step 5 – Sync license prices and choose what to report on
ROI Steward does not know your licensing costs. Before dollar savings appear, load your org's license types into ROI Entitlement Price, enter your contract costs, and choose which license types to include in analysis.
5a – Sync entitlements
Pull license types from your org into ROI Entitlement Price. Schedule this job regularly so Salesforce license type changes stay in sync (see Scheduled jobs reference below).
- Open ROI Configuration and expand Manage scheduled jobs.
- Click Run now on Entitlement Price Sync.
- When the job completes, open the ROI Entitlement Price tab and confirm rows exist. In large orgs the job runs in the background - check Setup > Apex Jobs until it shows Completed.
- Optionally click Schedule for weekly automatic sync. Schedule alone does not run until the next cron time.
5b – Add costs and choose license types to include
On each ROI Entitlement Price row you want in analysis, set Unit Cost, Cost Period, and Is Active:
- Include in cost and savings reports: Is Active checked and Unit Cost greater than zero
- Usage counts only: Is Active checked and Unit Cost zero
- Exclude: Is Active unchecked
Feature Licenses: The number of Feature License rows may be lower than Setup > Company Information because ROI Steward uses a packaged Feature License registry (custom metadata), not a full copy of Company Information. Twelve types ship by default.
Step 6 – Open the dashboard
After install, license activation, and entitlement sync (step 5a), open the ROI Steward tab. The dashboard reads current license usage from your org when the page loads - you see user and feature license counts and usage buckets straight away, without running step 7.
- Open the ROI Steward tab.
- License usage blocks load from your org.
- Assign ROI Amount Display and complete step 5b to see dollar amounts.
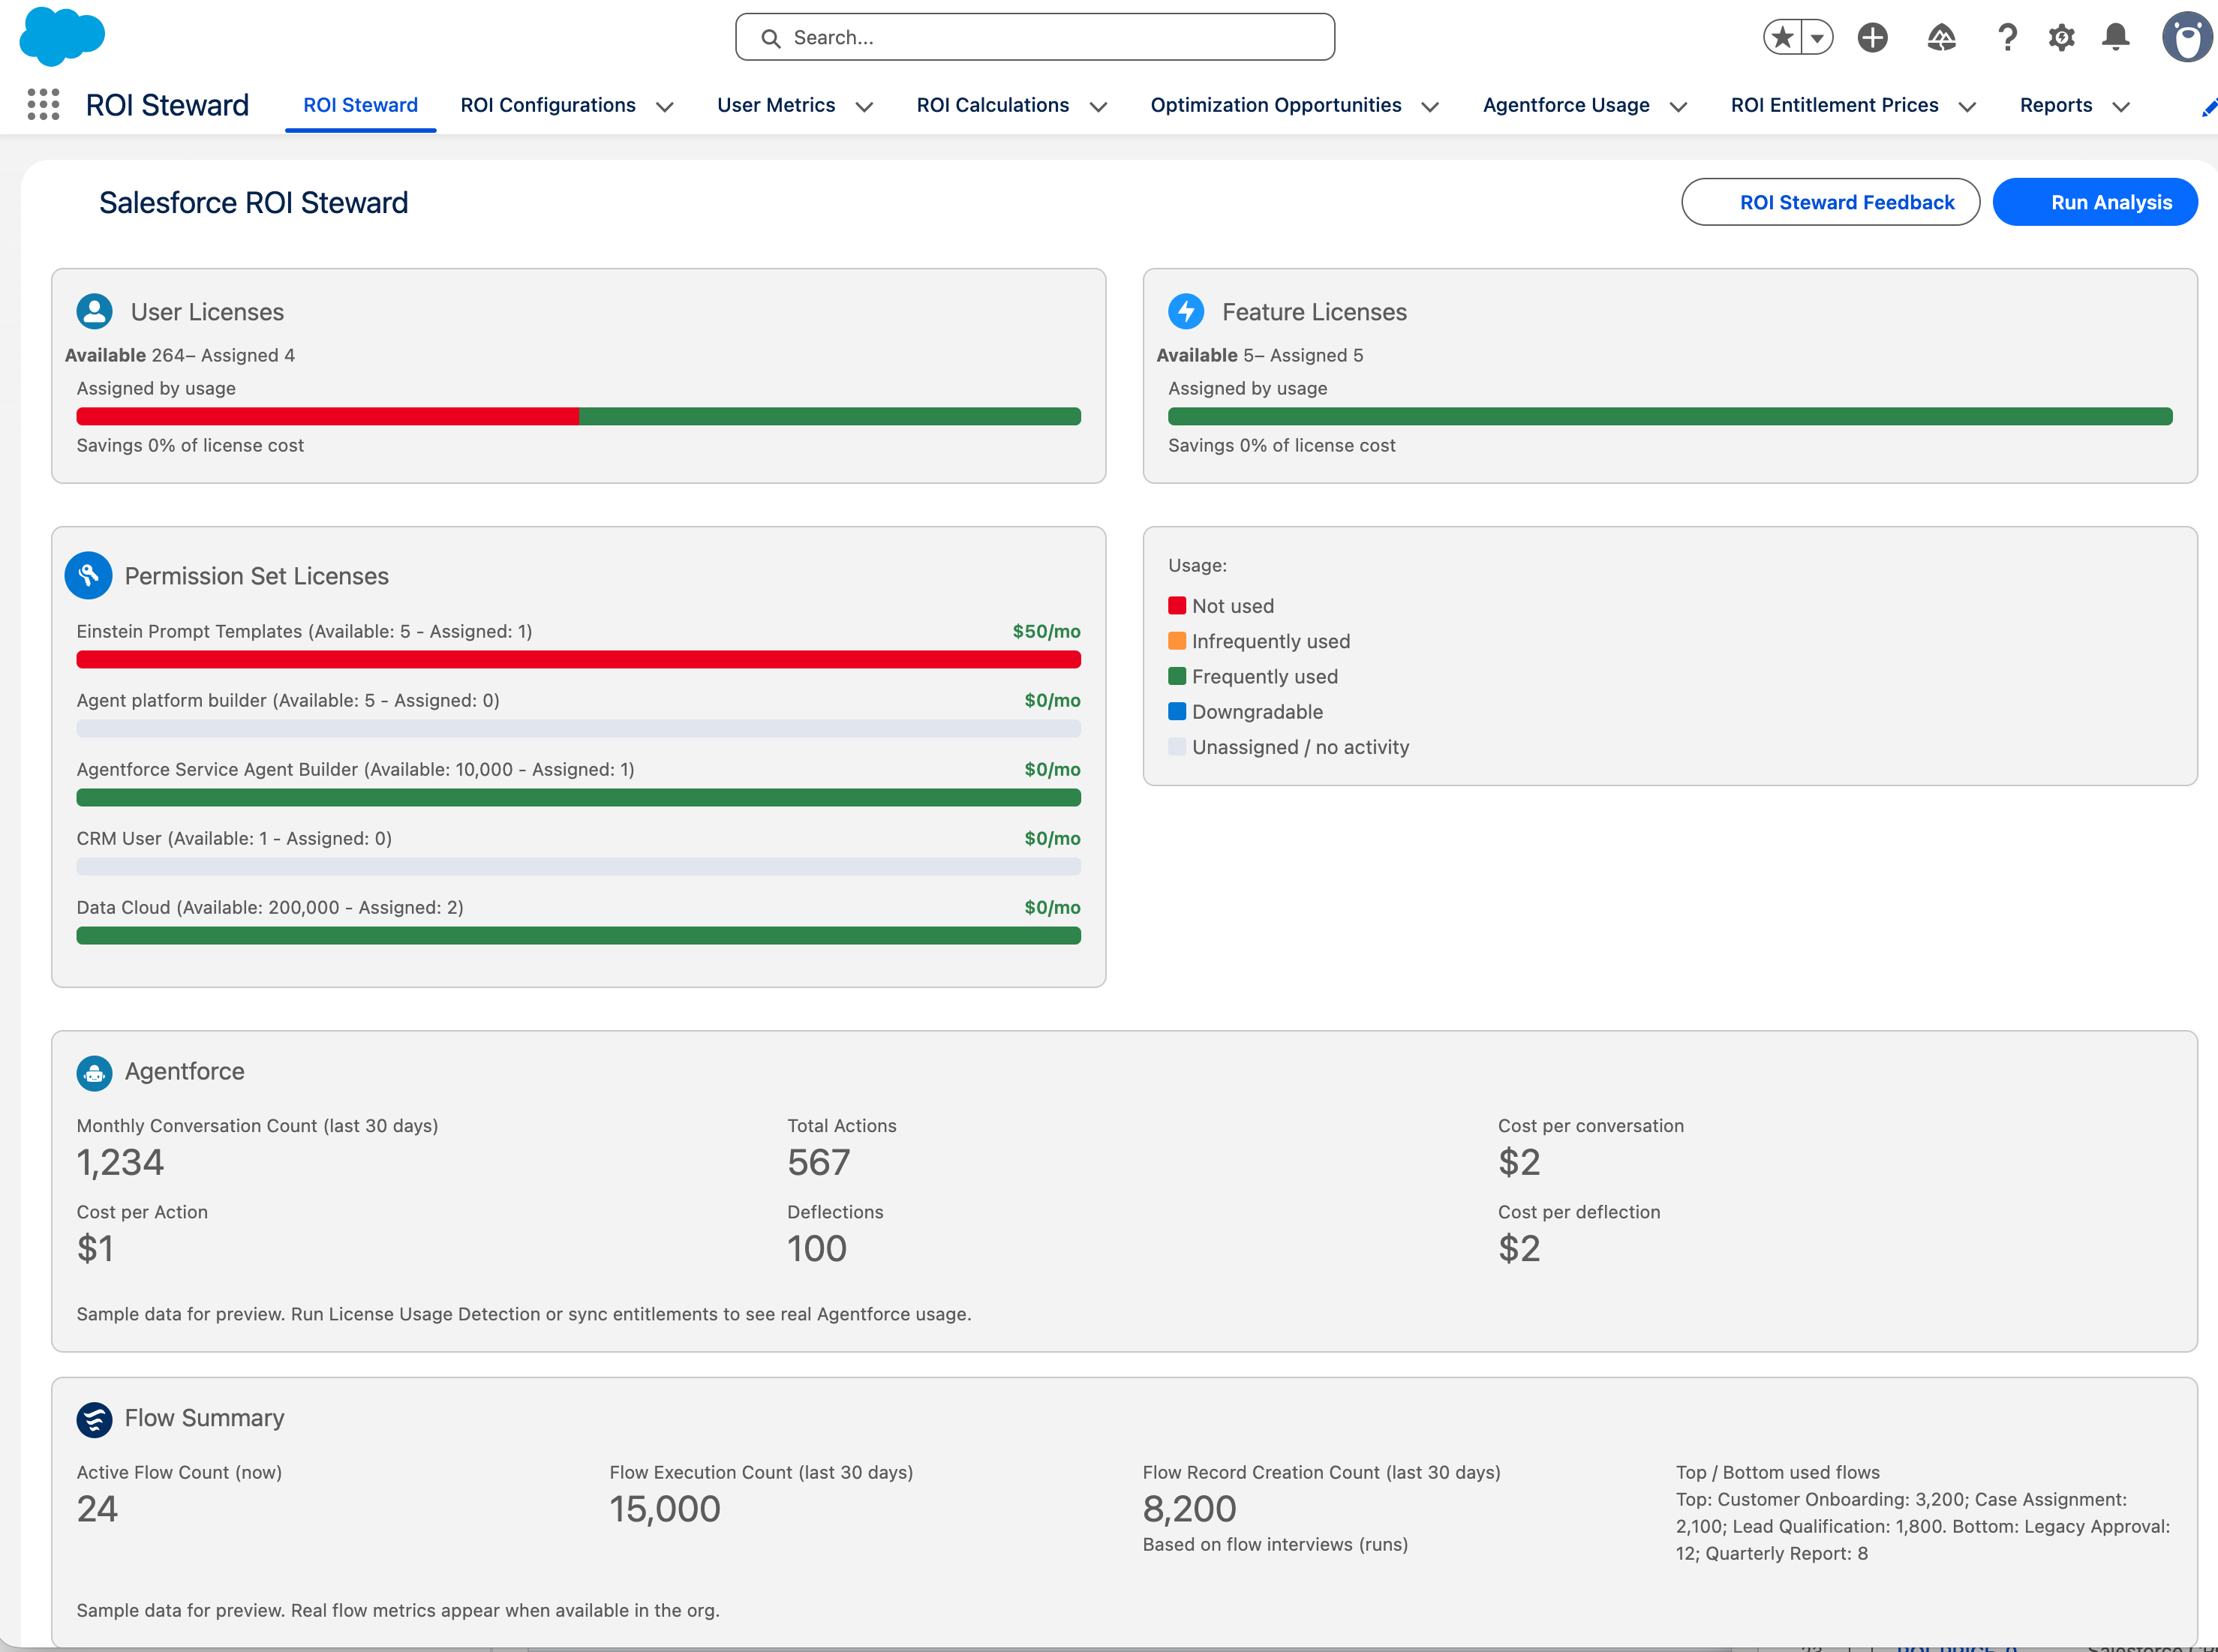
Run Analysis (optimization recommendations) requires step 7 first.
Step 7 – Capture usage and run analysis
Store a point-in-time copy of user-level license usage in your org. This creates the data Run Analysis needs to produce optimization recommendations and track usage over time.
- On ROI Configuration, expand Manage scheduled jobs.
- Click Run now on License Usage Snapshot.
- When the job completes (check Setup > Apex Jobs in large orgs), open the ROI Steward tab and click Run Analysis.
- Optionally click Schedule on License Usage Snapshot for weekly automatic capture.
Scheduled jobs reference
All background jobs run in your Salesforce org (production or sandbox). Manage them on ROI Configuration > Manage scheduled jobs (ROI Steward Admin only).
Run now starts the job immediately. Schedule registers a recurring cron job and does not run until the next scheduled time unless you also click Run now.
| Job | First-time setup | When you Schedule | Purpose |
|---|---|---|---|
| Entitlement Price Sync | Run now in step 5a | Weekly | Creates/updates ROI Entitlement Price from org license metadata |
| License Usage Snapshot | Run now in step 7 | Weekly | Stores usage history; creates user metrics for Run Analysis |
| ROI Analysis | Optional | Uses Analysis Frequency on ROI Configuration (not Disabled) | Automated Run Analysis on a recurring basis |
| Org Limits Snapshot | Optional | Daily | Historical org limits for trends (dashboard shows live limits without this) |
Completion emails: enable Schedule Activity Emails and set Admin Email on ROI Configuration.
Smaller orgs vs larger orgs
ROI Steward behaves the same in all orgs for install and setup. Two things change as org size grows: how much detail is stored, and whether work finishes immediately or in the background.
Detail mode vs summary-only (your choice)
On ROI Configuration, Store Detail Records (default: on) controls what is saved:
- Detail mode (default): creates ROI_User_Metric__c and ROI_Optimization_Opportunity__c per user. Use Run Analysis for individual recommendations. Best for most orgs.
- Summary-only (Store Detail Records off): creates ROI_License_Usage_Snapshot__c aggregates only - totals by license type, no per-user records. Run Analysis is not used. Best for very large orgs (e.g. 50,000+ users) where you want trends and totals without per-user storage.
Immediate vs background (5,000-user threshold)
| Feature | Smaller org | Larger org (5,000+ active users or user metrics) |
|---|---|---|
| License usage detection / snapshot | Usually finishes quickly after Run now | Runs as a batch job; check Setup > Apex Jobs until Completed |
| Run Analysis (ROI Steward tab) | Runs immediately | Runs as a batch job; check Setup > Apex Jobs |
| Scheduled jobs (Run now / Schedule) | Same jobs for all orgs; often complete in seconds | Same path; allow more time and monitor Setup > Apex Jobs |
Day-one dashboard (all org sizes)
Opening the ROI Steward tab shows live license usage counts when the page loads - no snapshot required. Step 7 stores data over time and enables Run Analysis (detail mode only).
License tier limit
Your license key sets a maximum user count. If the org has more active users than the license allows, detection and analysis stop with an error - regardless of org size.
Troubleshooting
| Problem | What to check |
|---|---|
| Install link fails or old version | Use the latest link from this page or your welcome email |
| Package installed into wrong org | Log in to target org first; use matching Production/Sandbox button |
| License key could not be verified | Key pasted completely; sandbox completed step 3 (ROI Production Org ID) |
| Validate License fails | Complete signup first; wait for license key email if you just signed up; activate Remote Site Setting ROI Steward Licensing (https://roisteward.com) |
| ROI Steward app not visible | ROI Steward Admin permission set assigned |
| No dollar amounts | ROI Amount Display assigned; Unit Cost on ROI Entitlement Price |
| No ROI Entitlement Price rows after sync | Use Run now (not only Schedule); check Setup > Apex Jobs |
| Run Analysis disabled or fails | Run now on License Usage Snapshot first; wait for Apex job to finish |
| ROI Analysis Schedule fails | Set Analysis Frequency to Daily, Weekly, or Monthly (not Disabled) |
| Job seems stuck | Setup > Apex Jobs for queueable/batch status |
| Wrong install host | login.salesforce.com for production; test.salesforce.com for sandboxes |
Contact us if you need help.

Ready to find savings in your org?
Start with a free audit or explore features before you install.